A Beginners Guide To Selfhosting Part 2
In Part 2, we will learn how to set up a VPS with Ubuntu Server and how to securely access the server with SSH.
The Virtual Private Server (VPS)
Provider
There are as many VPS providers as there are grains of sand on a beach. But the most important requirements (next to price, of course) are reliability and safety.
I've personally used a Hetzner root server for many years, but recently switched to NetCup, to downsize and switch to a VPS. They have regular promotions and I chose their VPS 2000 G11 (with an additional 512 GB SSD promotion) for around 18$ / month.
The VPS has 8 virtual CPU cores, 16 GB ECC RAM, 1 TB SSD and unlimited traffic. That's more than enough for my services and a couple websites for my customers.
A good alternative is their VPS 3000 ARM G11 or VPS 4000 ARM G11. They run ARM instead of x86, but Docker as well as all my services are ARM compatible.
Whichever provider you choose, make sure that it is a well known and reliable provider. There are many provider with cheap prices but terrible reliability and customer support. Having to set up your whole server from scratch because your provider sucks is a great learning opportunity, but still unnecessary and annoying.
Operating System
Once you've chosen a VPS, any good provider will guide you through your choice of different Linux server operating systems. Ubuntu Server is a reliable and well supported OS and their LTS versions receive updates for 2 years. As such, it is my server OS of choice. At time of writing, their current LTS is 24.04.3 and next year, the new LTS will be released (Ubuntu Server 26.04 LTS).
Security
During setup you will have to choose a username and password. This user has sudo privileges, which means it can act as the system administrator. I recommend using a long and difficulty password. You can use Bitwarden Password Generator to generate a password with at least 20 characters. Be sure to tick all additional options.
IP Adress
With your new VPS, you will receive an IPv4 adress (XXX.XXX.XXX.XXX). This is the adress of your server on the public internet and the one all your sub-domains will be linked to later.
Your VPS will also have an IPv6 adress (XXXX:XXXX:XXXX:XXXX:XXXX:XXXX:XXXX:XXXX), but for the time being, we will not bother with that.
Connecting to your server
Once your server is up and running you will need to connect to it. While many provider offer terminal access through their web-interfaces, the default way to access it is through SSH (Secure Shell Protocol). Every modern operating system comes with SSH pre-installed.
To connect to your server, open a terminal (Windows / Linux: Windows-Key -> Search for Terminal | MacOS: CMD + Space -> Search for Terminal). In your terminal enter
# Anything after a # is a comment and should not be copied
# Replace USERNAME and XXX with your Username and IPv4
ssh USERNAME@XXX.XXX.XXX.XXX
SSH will ask if you want to trust the server, which you will accept with yes. After that it will ask you for the password you set up earlier.
The first thing we will, once you are connected, do is update the server and software. To do that, enter
sudo apt update
# It will ask you for your password
sudo apt upgrade -y
# The system and software will update, if there are any updates
sudo reboot
# The system will reboot and you will be disconnected from SSH
Wait for a minute or two and reconnect to your server with
#Replace USERNAME and XXX with your Username and IPv4
ssh USERNAME@XXX.XXX.XXX.XXX
You should be reconnected to your VPS. To close the connection use CTRL + D.
SSH Keyfile
A SSH keyfile is, as the name suggests, a file that acts as a key for your VPS. With it, you can connect to your server without your password. While it is not necessarily safer than using your password, it is more convenient. If you want to keep using your password, you can skip this part.
To create a keyfile, open a new Terminal window and type
# Create a new folder in your home folder
mkdir .ssh
# Change your directory to the new folder
cd .ssh
# Create a new keyfile
ssh-keygen -f ./NameOfYourKey
It will ask you if you want to password protect the keyfile. Without a password, anyone who has your key has access to server, just like your car keys. For security reasons I tend to create another difficult password for my keyfile.
Once the keyfile is set up, you will find a NameOfYourKey and NameOfYourKey.pub file in your .ssh folder. The .pub file is safe, but the file without .pub is your actual key. Be sure to make a copy of both and store them somewhere safe.
To add the new key to your VPS, open the .pub file with a text editor and use the following Terminal commands in your terminal
#Replace USERNAME and XXX with your Username and IPv4
ssh USERNAME@XXX.XXX.XXX.XXX
# Enter your username password
mkdir .ssh
# Create a .ssh folder, if it doesn't exist
cd .ssh
# Change directory into the .ssh folder on your VPS
nano authorized_keys
# Opens a terminal text editor on the VPS
# Copy the content of your .pub file from your PC (CTRL+C) into your Terminal (SHIFT+CTRL+V / CMD+V)
# Save your authorized_keys file with CTRL+O -> Enter
# Close the terminal text editor with CTRL+X
# Disconnect with CTRL+D
Now that your key is connected to your VPS, we will create a config file for SSH to make it easier to connect to your VPS. Open your text editor and add the following lines
Host NAME # Name you want to use for the server
  Hostname XXX.XXX.XXX.XXX # Your IPv4
  IdentityFile ~/.ssh/NameOfYourKey # Your Keyfile
  user USERNAME # Your Username
  Port 22 # Default SSH Port
  TCPKeepAlive yes
Save the file in your .ssh folder as config (no .txt extension). Now you can simply connect to your VPS in your Terminal with
ssh NAMEDisable password login (optional)
For additional security, it is possible to make the keyfile mandatory to login to your server, by disabling password login with USERNAME@XXX.XXX.XXX.XXX. If your keyfile is password protected and you disable SSH password login, anyone who wants to access your server will need all of the following three things
- The Keyfile
- To connect to the VPS
- The Keyile Password
- To login to the VPS
- The Username & Password
- To get admin privileges
As you can see, disabling SSH password authentication adds a significant hurdle to anyone, trying to take over your VPS. Without disabling it, any bad actor only needs your Username & Password, since the keyfile is just an alternative.
But there is, of course, also the risk of you being locked out of your server, if you loose your keyfile. Luckily any decent VPS provider offers web based shell access to your server, so you can easily revert this change if necessary.
To disable SSH password authentication connect to your server and use the following Terminal commands
sudo nano /etc/ssh/sshd_config
# Scroll down to
#PasswordAuthentication yes
# Remove the # and change the yes to no
PasswordAuthentication no
# Save your changes with CTRL+O -> Enter
# Close the editor with CTRL+X
sudo systemctl daemon-reload
sudo systemctl restart ssh
To make sure it worked, open another Terminal window and connect to your Server with
# Replace USERNAME and XXX with your Username and IPv4
ssh USERNAME@XXX.XXX.XXX.XXX
You will get an error message (Permission denied (publickey)). Now in that same Terminal window connect with
# Replace USERNAME and XXX with your Username and IPv4
ssh NAME
If your keyfile login works, you can disconnect with CTRL+D and close the Terminal window. If you want to revert the change, connect to your VPS and in the Terminal do the following
sudo nano /etc/ssh/sshd_config
# Scroll down to PasswordAuthentication no
# Add the # and change the no to yes
#PasswordAuthentication no
# Save your changes with CTRL+O -> Enter
# Close the editor with CTRL+X
sudo systemctl daemon-reload
sudo systemctl restart ssh
Now your VPS is set up with Ubuntu Server LTS and you can access it with your keyfile (or password) wherever and whenever you want.
Fail2Ban
Lastly, we will install Fail2Ban, which is an additional security layer for your SSH access. Fail2Ban checks your SSH access logs (/var/log/auth.log) and bans the IP of bad actors after too many failed SSH login attempts.
To install Fail2Ban, connect to your server and use the following commands.
# Update the repositories
sudo apt update

# Install Fail2Ban
sudo apt install fail2ban

# Enable the Fail2Ban Service
sudo systemctl enable fail2ban

# Start the Fail2Ban Service
sudo systemctl start fail2ban

# Check to see if it's running
sudo systemctl status fail2ban
By default, it will ban any IP for 10 minutes, that has 5 failed attempts in the last 10 minutes. If you want to change the default settings you can follow these commands
# Copy the default jail.conf
sudo cp /etc/fail2ban/jail.conf /etc/fail2ban/jail.local

# Open the new jail.local with nano
sudo nano /etc/fail2ban/jail.local

# Scroll down until you see [DEFAULT] (without #)

# Change the 10m bantime
bantime  = XXm

# Change the number of failed attempts before triggering a ban
maxretry = X

# Save your changes with CTRL+O
# Close nano with CTRL+X

# Restart the Fail2Ban service
sudo systemctl restart fail2ban
Keep in mind that it will also ban you if you misstype your keyfile password wrong too many times. If that happens, you can either wait out the bantime or connect to your server with a VPN (potentially unsafe) or a mobile hotspot from your phone.
Transfering files to / from the VPS
While there are many different ways to transfer files to and from your server, in this Beginners Guide, we will focus two of the simplest:
- SFTP (Secure File Transfer Protocoll) through FileZilla for multiple files / folders.
- SCP (Secure Copy Protocoll) for single files
FileZilla
In the FileZilla Server Manager, create a New Site with the following settings
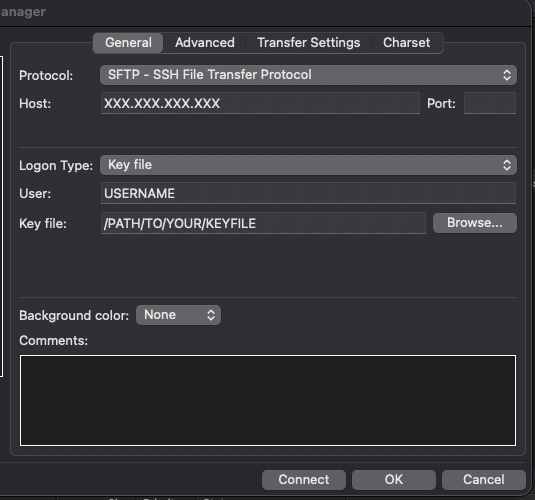
It will ask you to convert your keyfile to a FileZilla compatible format (.ppk). Once it's set up, you can connect to your VPS and create a folder for your file transfers. I use a fz_transfer folder in my HOME folder, to use for anything I transfer through FileZilla.
You find your local filesystem on the left side, and your VPS on the right side. Just like with any file browser, you can drag and drop files to and from your server.
SCP
To transfer files to and from your VPS with SCP, open a Terminal window and use the following commands
# Transfer a file to your HOME folder
cd /PATH/TO/YOUR/FILE
scp ./FILE NAME:~/

# Transfer a file from your VPS to your local PC
cd /PATH/WHERE/YOU/WANT/FILE
scp NAME:~/PATH/TO/FILE ./- NAME refers to your .ssh/config Host
- ~ is a shorthand for your /home/USERNAME folder on your VPS
FileZilla and SCP have only USER priviliges, so you can only access files and folders that your USERNAME can. I recommend copying files to and from your VPS home folder (/home/USERNAME/...), to avoid access restriction problems.
This concludes Part 2 of our series.
In Part 3, we will install and setup Docker, as the container framework, for all our services.